Hello everyone. One of my closest friends is getting married in May and my girls are the flower girls :) They are so excited to wear their wedding dresses (as they call them).
Her bridal shower was this past weekend and I have been wanting to try glass etching. So I did a very simple glass etching on a glass baking dish as part of the gift. I used Alpahlicious to cut the letters out of vinyl. I was really impressed with how simple it is and can't wait to do more!
I also made a very simply card using Artiste for the bow and Art Philosophy for the background.
Here are some pictures.
Thanks for stopping by, I hope you have a crafty day!
PS: I am linking this up over at Sarah Hamer Designs so stop by and link up too! http://www.pinkcricut.com/2013/04/link-tuesday-44/
This is my personal blog that hopefully others will enjoy finding information on projects, ideas, etc. that I have created, scraplifted or borrowed :)
Showing posts with label Art Philosophy. Show all posts
Tuesday, April 9, 2013
Thursday, November 29, 2012
Purse Explosion Box Post It Note Holder
A co-worker of mine has accepted a new position so we threw her a farewell get together. She and I have worked together for almost 7 years so I wanted to make her a little gift. I saw this purse explosion box at http://qbeesquest.blogspot.com/2011/01/explosion-box-purse.html and knew I wanted to try it. Once it was made I thought it would be perfect as a post it note holder for her desk in her new office so I just added a pen and some post its. I think it turned out cute for my first try :)
The best part is I only used 3 pieces of paper, a ribbon and velcro (to keep it closed). One for the box, the black for the top (I used Art Philosophy to cut the topper) and accents and the pink animal print. I love how cute it turned out and may do some in Christmas paper if I can find some cute Christmas post it pads for the teachers. You could easily make it a gift card holder or add some candy. So many possibilities! I added the Thank You from a My Creative Time stamp set but you could do any sentiment here!
Thanks for stopping by! Hope you have a crafty day!
The best part is I only used 3 pieces of paper, a ribbon and velcro (to keep it closed). One for the box, the black for the top (I used Art Philosophy to cut the topper) and accents and the pink animal print. I love how cute it turned out and may do some in Christmas paper if I can find some cute Christmas post it pads for the teachers. You could easily make it a gift card holder or add some candy. So many possibilities! I added the Thank You from a My Creative Time stamp set but you could do any sentiment here!
Thanks for stopping by! Hope you have a crafty day!
Thursday, November 1, 2012
Happy Halloween!
Hello all. I hope everyone had a great Halloween. We just survived Hurricane Sandy. We were very lucky here in central MD to not get much (we had worse back in July with the Derocho storm). We actually did not lose power which is amazing for us, we usually lose it for 4 days at a time. I think we were better prepared this time. Unfortunately, folks to the east and north were not so lucky. We are praying for a quick recover for them all.
This year for Halloween I made two crafts (I still need to do something for my 3 year olds preschool class but have until next week :)). First, I made cute little bats with a fun size Hershey bar in them for my 4 year olds pre-k class because she dressed as a bat :) I used the Artiste cartridge for the bat, a circle punch for the face and some papers I had left over from last year. For the face, I used a Peachy Keen set called Monster Mash (I combined a mouth and eyes from different stamps in the set because I did not want my bat to look mean:) I had my daughter write her name on the inside and I used a ribbon that can easily be slid off to keep them closed.
Here are my bats and my cute little bat (I hand cut her mask because we could not find a bat costume):

This year for Halloween I made two crafts (I still need to do something for my 3 year olds preschool class but have until next week :)). First, I made cute little bats with a fun size Hershey bar in them for my 4 year olds pre-k class because she dressed as a bat :) I used the Artiste cartridge for the bat, a circle punch for the face and some papers I had left over from last year. For the face, I used a Peachy Keen set called Monster Mash (I combined a mouth and eyes from different stamps in the set because I did not want my bat to look mean:) I had my daughter write her name on the inside and I used a ribbon that can easily be slid off to keep them closed.
Here are my bats and my cute little bat (I hand cut her mask because we could not find a bat costume):
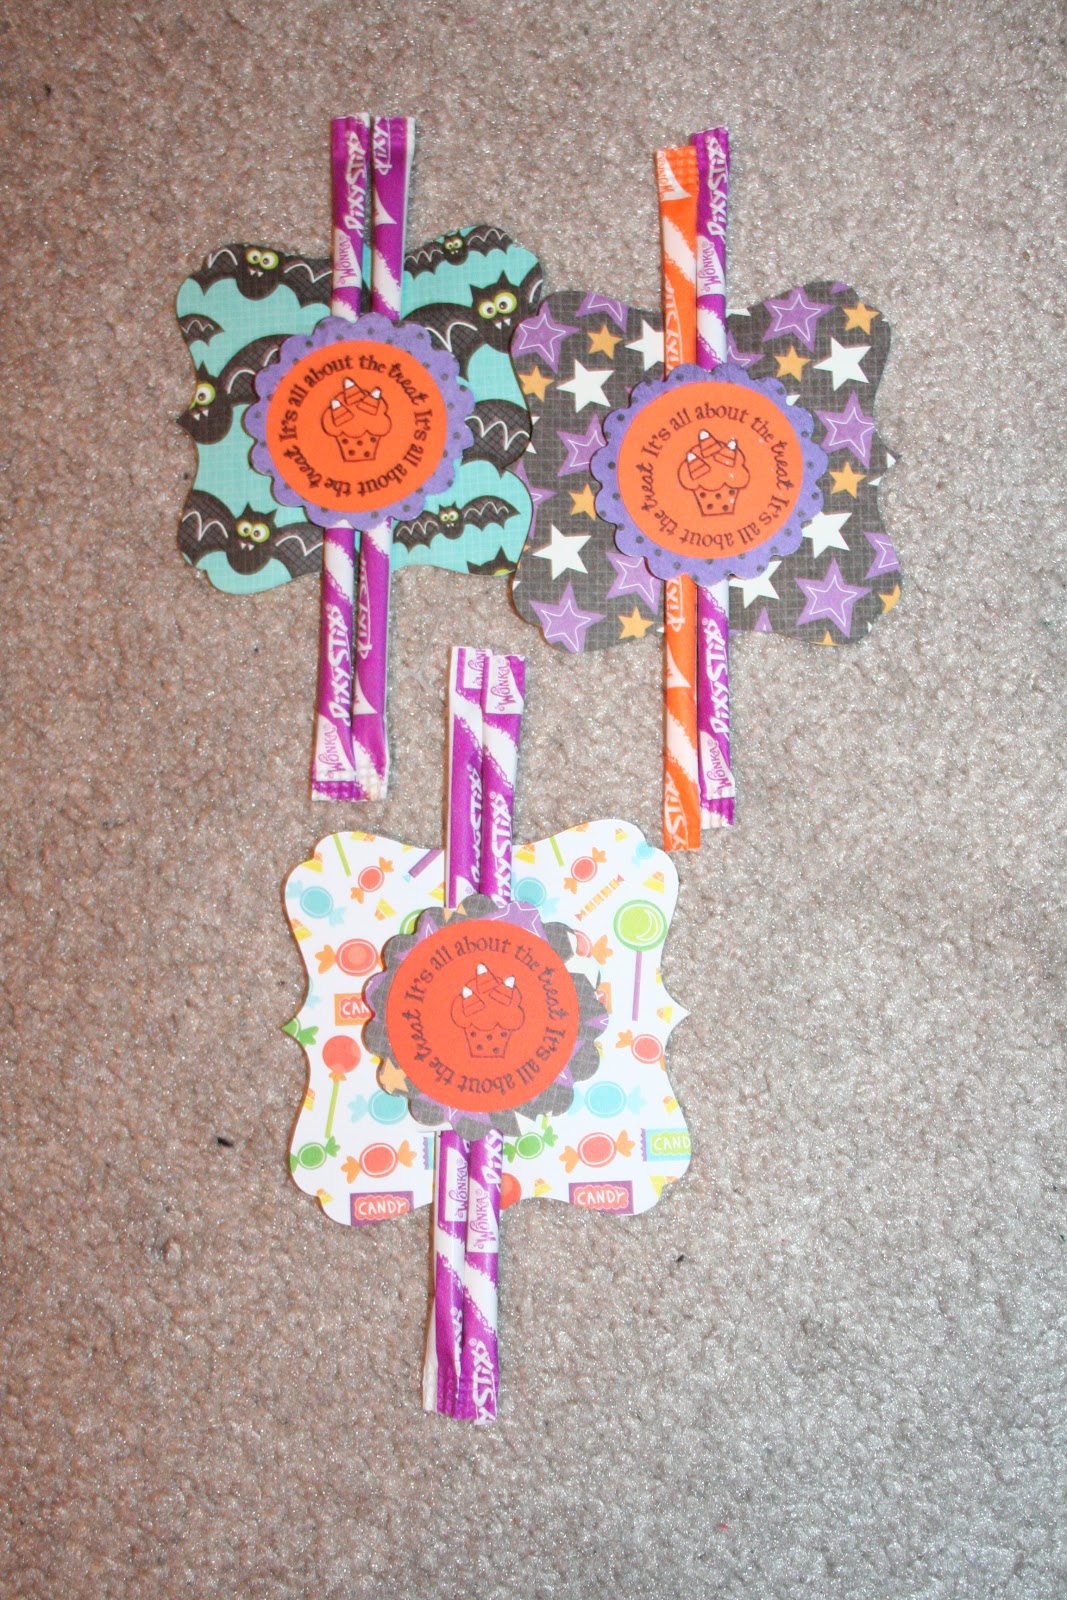
For my boys (9 and 11) I used this post from My Creative Time for inspiration and did some cute little cuts from Art Philosophy (I could cut 9 at a time versus using a die to cut one at a time) and put some pixie sticks through added a cute little Halloween sentiment from My Creative Times All Around Halloween set.
Here are those cute treats:
Lastly, for Halloween I made some costumers or parts of costumes. For my 3 year old she wanted to be a bat and I am not a sewer so I decided to do hers out of paper. I used the Art Philosophy for the tear drops which I then turned upside down. I used Create a Critter for the owl which I had cut down to make into a mask and added some circles and small feathers and an elastic band to make into a mask. She loved it and luckily it survived. Of course she has to wear it next week to preschool because her class Halloween event was cancelled this week due to the Hurricane so I hope it makes it until then! I also made my 9 year old sons Jayson Werth beard using a picture, some cardstock and some elastic. Here is a picture of the two cuties:
My oldest wanted to go as the Sun Drop guy (have you seen those soda commercials, he walks around dancing which cracks my son up). All I had to do for him was make an iron on since we did not have a Sun Drop t-shirt. It worked ok but I did not have the iron on for dark colored shirts so it is not that visible via picture. Here is my handsome guy:
WOW! That was a lot in a few days of work! I guess now it is onto Thanksgiving and Christmas! Thanks for stopping by. I hope you have a crafty day.
PS: I am linking up over at Sarah Hamer Designs, stop by and link up too! http://www.pinkcricut.com/2012/10/link-tuesday-25/
Tuesday, October 16, 2012
Happy 5th Birthday Little Dancer
My daughters are going to a 5th birthday party this weekend for our neighbor who also happened to be in ballet with my older (4) daughter. I knew right away I wanted to use the Twinkle Toes cartridge. This little ballerina is just too cute! I have to make this same card for my little ballerina when she turns 5 this January!
I used Twinkle Toes for the ballerina and Art Philosophy for the card base (I welded the two shapes together to make a card, the cut it a little smaller and cut in the middle for the patterned paper). I used Peachy Keen Princes Faces for the face and I used My Creative Time for the All Around birthday stamp. I used an Action Wobble to make my little dancer dance! I used my white gelly roll pen to add the faux stitching accents.
Thanks for stopping by, hope you have a crafty day!
PS: I am linking this up over at Sarah Hamer Designs so stop by and Link Up Too! http://www.pinkcricut.com/2012/10/link-tuesday-23/
I used Twinkle Toes for the ballerina and Art Philosophy for the card base (I welded the two shapes together to make a card, the cut it a little smaller and cut in the middle for the patterned paper). I used Peachy Keen Princes Faces for the face and I used My Creative Time for the All Around birthday stamp. I used an Action Wobble to make my little dancer dance! I used my white gelly roll pen to add the faux stitching accents.
Thanks for stopping by, hope you have a crafty day!
PS: I am linking this up over at Sarah Hamer Designs so stop by and Link Up Too! http://www.pinkcricut.com/2012/10/link-tuesday-23/
Labels:
Art Philosophy,
link up,
My Creative Time,
Peachy Keen,
Twinkle Toes
Tuesday, July 24, 2012
Wedding Card
Hello all. Wow, I really have not been crafting lately! Things are so busy with Ed and the kids so I do not have much free time but I did get to make a simple card for a wedding. I also made some tags for the wedding favors but I will share those later! I used some simple hearts (Art Philosophy) that I then used a very small recollections punch to cut out hearts. I then used Art Philosophy to cut a small tag and used my Pink By Design Big Thoughts set to stamp love. Lastly, I inked the edges of the small tag. I loved the background paper with all of the XOXOXOXO's on it and it matched the colors of the wedding so it was perfect!
Thanks for stopping by! Hope you have a crafty day.
PS: I am linking this up over at Sarah Hamer Designs, so stop by and link up too! http://www.pinkcricut.com/2012/07/link-tuesday-13/
Thanks for stopping by! Hope you have a crafty day.
PS: I am linking this up over at Sarah Hamer Designs, so stop by and link up too! http://www.pinkcricut.com/2012/07/link-tuesday-13/
Labels:
Art Philosophy,
link up,
Pink By Design Stamps,
wedding
Monday, June 4, 2012
Mady Moo Turns 3: Mickey Mouse Invitations
Hello all. I hope everyone is doing well. It has been another long
couple of weeks but we are hanging in there and are so blessed to be
getting so much support from family and friends. (Thanks for the
prayers).
I decided to do a Mickey Mouse Club House birthday for my baby girl, Mady Moo, who will be 3 this Friday. I am doing her party next weekend because my hubby has chemo this week and I want him to be able to help and be a part of the party so we are doing it on an off week. I saw a few of these invitations online in different places when I search for Mickey Mouse invitations. They were super easy.
I used my Mickey Font cartridge to cut the base of Mickey in black, then I used Art Philosophy to cut the red circles and then just cut those in half using my paper trimmer. Lastly on that side I just added two white buttons from the little jar of white buttons I bought at Michaels in the $1 section. For the details I printed them on the computer, I did download one Mickey font for the Hot Dog... part. I then printed 4 on a page and used the center cut feature on the Cricut and a circle from Art Philosophy to cut them out. They were pretty easy but just took a little time to cut and assemble. I stayed up late one night last week doing them. I think they turned out cute.
Because we have so much going on the party is going to be very small and I do not plan to do much except a banner, center piece (maybe) and cupcakes (maybe cake pops too). I go with my hubby to his chemo appointment this Wednesday which is all day so I am hoping to get some of the banner pieces cut and take it with me to work on, we will see! Maybe I can get him to help...doubt it :)
Thanks for stopping by. I hope everyone has a crafty day!
PS: I am linking this up over at Sarah Hamer Designs so stop by and link up too! http://www.pinkcricut.com/2012/05/10552/
I decided to do a Mickey Mouse Club House birthday for my baby girl, Mady Moo, who will be 3 this Friday. I am doing her party next weekend because my hubby has chemo this week and I want him to be able to help and be a part of the party so we are doing it on an off week. I saw a few of these invitations online in different places when I search for Mickey Mouse invitations. They were super easy.
I used my Mickey Font cartridge to cut the base of Mickey in black, then I used Art Philosophy to cut the red circles and then just cut those in half using my paper trimmer. Lastly on that side I just added two white buttons from the little jar of white buttons I bought at Michaels in the $1 section. For the details I printed them on the computer, I did download one Mickey font for the Hot Dog... part. I then printed 4 on a page and used the center cut feature on the Cricut and a circle from Art Philosophy to cut them out. They were pretty easy but just took a little time to cut and assemble. I stayed up late one night last week doing them. I think they turned out cute.
Because we have so much going on the party is going to be very small and I do not plan to do much except a banner, center piece (maybe) and cupcakes (maybe cake pops too). I go with my hubby to his chemo appointment this Wednesday which is all day so I am hoping to get some of the banner pieces cut and take it with me to work on, we will see! Maybe I can get him to help...doubt it :)
Thanks for stopping by. I hope everyone has a crafty day!
PS: I am linking this up over at Sarah Hamer Designs so stop by and link up too! http://www.pinkcricut.com/2012/05/10552/
Labels:
Art Philosophy,
birthday,
buttons,
center cut,
link up,
Mickey Font
Thursday, March 15, 2012
Class Treats for St. Patricks Day!
Hello all. Sorry I have been MIA, it has been busy around here.
So I am going to my 8 year olds class today as a mystery reader (he has NO idea I am coming :)). Since I chose a couple of St. Patricks Day themed books I also wanted to bring a treat but like usual waited until the last minute :) While I was driving I remember I had two unopened bag of M&M's. One from Christmas and one from Valentine's Day. I knew I could pull out the greens from Christmas and the whites from Valentine's and do M&M sticks!
Here they are:
I decided to go with an easier topper and did a shamrock from Art Philosophy (it was on a tag so I did hide contour for the tag parts) and then I did a flip on one and welded the two together to make it a topper. It worked perfect. I also had a cute cheapy little $1 stamp from AC Moore that said Happy St. Patricks day. It was PERFECT! I hope the kids will love them! Now I have to keep myself from eating the leftover pink and red M&M's!
Thanks for stopping by, have a crafty day.
PS: I am linking this up over at Sarah Hamer Designs so stop by and link up too! It is at http://www.pinkcricut.com/2012/03/link-party-6/
I am also entering this over at Cooking with Cricut for this weeks challenge, so stop by and join the fun! It is http://www.cookingwithcricut.com/2012/03/77-st-pats-and-rainbows.html
So I am going to my 8 year olds class today as a mystery reader (he has NO idea I am coming :)). Since I chose a couple of St. Patricks Day themed books I also wanted to bring a treat but like usual waited until the last minute :) While I was driving I remember I had two unopened bag of M&M's. One from Christmas and one from Valentine's Day. I knew I could pull out the greens from Christmas and the whites from Valentine's and do M&M sticks!
Here they are:
I decided to go with an easier topper and did a shamrock from Art Philosophy (it was on a tag so I did hide contour for the tag parts) and then I did a flip on one and welded the two together to make it a topper. It worked perfect. I also had a cute cheapy little $1 stamp from AC Moore that said Happy St. Patricks day. It was PERFECT! I hope the kids will love them! Now I have to keep myself from eating the leftover pink and red M&M's!
Thanks for stopping by, have a crafty day.
PS: I am linking this up over at Sarah Hamer Designs so stop by and link up too! It is at http://www.pinkcricut.com/2012/03/link-party-6/
I am also entering this over at Cooking with Cricut for this weeks challenge, so stop by and join the fun! It is http://www.cookingwithcricut.com/2012/03/77-st-pats-and-rainbows.html
Tuesday, February 28, 2012
Manly Birthday Card
Recently my uncle turned 60 and we were all going to dinner to celebrate so I wanted to make him a card. I knew I needed something masculine so I chose brown and blue papers and then I thought I would try a window/shadow type box because I have never done one before. Here is the card:
I used Art Philosophy and cut the card using the card feature at 5 1/2, then I used the center cut feature to cut the window at 3inches. I then used Lyrical Letters and the Jumbo feature to cut my 6 and 0. I added some stitching with my white gelly roll pen and I was all set :) I do not get to do manly cards much but I think this one turned out nice using the brown and blues!
Thanks for stopping by, have a crafty day!
I used Art Philosophy and cut the card using the card feature at 5 1/2, then I used the center cut feature to cut the window at 3inches. I then used Lyrical Letters and the Jumbo feature to cut my 6 and 0. I added some stitching with my white gelly roll pen and I was all set :) I do not get to do manly cards much but I think this one turned out nice using the brown and blues!
Thanks for stopping by, have a crafty day!
Friday, February 17, 2012
Valentine Treats for the Kids Classmates and Teachers
I think I went back and forth on what to make for the kids classmates and teachers for that matter a 100 time. I find way TOO many ideas on Pinterest that I always want to try. Then of course February 13th comes and I have nothing made yet, LOL. So here is what we ended up with.
For the boys their classmates go a hug and a kiss (or two or three)
I just printed the sentiment on my computer, cut it out and rounded the edges. I did the same with the red paper. I then tied the bag closed with some ribbon and the tag (the boys signed their names on their tags for theirs, this was an extra). I came up with this idea after seeing a squeeze and a kiss on Pinterest. I remember these little hugs juice barrels from when I was a kid and thought they would be perfect :) Whats a little more sugar on Valentines day, right!
My daughter took some goldfish crackers:
I had seen a few versions of this on Pinterest and knew I wanted to try it. I used Art Philosophy for the bag toppers (scored them in the middle), I bought the bags with hearts on them at the party store, I printed the sentiments on the computer and just used my Creative Memories circle punch (1.5 inches) and my Fiskars scalloped circle punch (2 inches). She also wrote her name on the back of the bag topper but I did not get a picture of that :(
For the teachers I just did this cute idea I saw on Pinterest and that I wanted to do for my boys but my husband was not too keen on the idea of sending glass bottle so I did three 6 packs and put them in the teachers lounge at my boys school, plus made specific ones for their teachers and then I made 3 for my daughter to give to her two preschool teachers and the secretary there.
The hardest part was finding the strawberry Crush which I have to thank my friend Steph for letting me know they were at Walmart and my mom for picking me up so many that I had left overs, LOL.
The teachers loved the sodas and the kids loved the Valentine goodies. This is probably the last year I will do these for my oldest (I will still do for his teachers) so that was bitter sweet but at least next year I will have my other daughter to make for also since she will be in preschool :)
Thanks for stopping by, have a crafty day!
For the boys their classmates go a hug and a kiss (or two or three)
My daughter took some goldfish crackers:
I had seen a few versions of this on Pinterest and knew I wanted to try it. I used Art Philosophy for the bag toppers (scored them in the middle), I bought the bags with hearts on them at the party store, I printed the sentiments on the computer and just used my Creative Memories circle punch (1.5 inches) and my Fiskars scalloped circle punch (2 inches). She also wrote her name on the back of the bag topper but I did not get a picture of that :(
For the teachers I just did this cute idea I saw on Pinterest and that I wanted to do for my boys but my husband was not too keen on the idea of sending glass bottle so I did three 6 packs and put them in the teachers lounge at my boys school, plus made specific ones for their teachers and then I made 3 for my daughter to give to her two preschool teachers and the secretary there.
The hardest part was finding the strawberry Crush which I have to thank my friend Steph for letting me know they were at Walmart and my mom for picking me up so many that I had left overs, LOL.
The teachers loved the sodas and the kids loved the Valentine goodies. This is probably the last year I will do these for my oldest (I will still do for his teachers) so that was bitter sweet but at least next year I will have my other daughter to make for also since she will be in preschool :)
Thanks for stopping by, have a crafty day!
Wednesday, January 25, 2012
CWC Weekly Challenge # 70-No Cards, Must have polka dots and use yellow!
Hello and welcome to another Weekly Challenge with Cooking with Cricut. This week we were challenged to make anything but a card and it has to have polka dots and the color yellow. I needed to make a thank you gift for a couple we are close friends with, I made the wife's thank you gift already (which I posted earlier this week here) and now I needed something manly, LOL. I usually buy the husband a small bottle of liquor each year for their holiday party, it started as a little joke but has carried on each year. So since I know he has already used that bottle I thought as the thank you I would buy him another one but this time I wanted to put it in something with a little note of thanks on it. I found this idea online at http://cabioscraftcorner.blogspot.com/2011/12/magnolia-edwin-label-tag-on-mini-bottle.html and it was perfect! (I always look online first because why recreate the wheel, right!). Here is her post with the details http://cabioscraftcorner.blogspot.com/2012/01/mini-bottle-holder-tutorial-using.html. The only difference I did was for my tag I used a 2 inch scalloped circle and a 1.5 inch circle. I put the large stickles bottle inside, you could easily adjust the size and score lines to make it a little smaller for a small bottle of stickles. I think next I will try and see if I can do like 4 or 6 and attach them to make a 4 or 6 pack.
I used my Cricut Art Philosophy to cut the 1.5 inch yellow circle and 2 inch scalloped circle but other wise it was just scoring and cutting in the right places. I used my Pink by Design Big Thoughts stamp set for the Thanks so much sentiment (which was perfect). Unfortunately, I do not have the bottle of liquor yet so I had to used a bottle of stickles as a stand in for the picture :) but you get the idea (you could also use it to give a bottle of stickles as a gift too because they fit perfect!). I think I may do something like this but in a Christmas theme next year for the holidays, what a cute little "grown-up" gift! Plus even if you do not drink (like me) those little mini bottles are so darn cute!
Thanks for stopping by, make sure you head over to Cooking with Cricut and get in on this weeks challenge!
PS: Because I used my Pink By Design stamps I am also "linking" this up over at http://www.pinkcricut.com/ for this weeks link up party!
Have a crafty day!
I used my Cricut Art Philosophy to cut the 1.5 inch yellow circle and 2 inch scalloped circle but other wise it was just scoring and cutting in the right places. I used my Pink by Design Big Thoughts stamp set for the Thanks so much sentiment (which was perfect). Unfortunately, I do not have the bottle of liquor yet so I had to used a bottle of stickles as a stand in for the picture :) but you get the idea (you could also use it to give a bottle of stickles as a gift too because they fit perfect!). I think I may do something like this but in a Christmas theme next year for the holidays, what a cute little "grown-up" gift! Plus even if you do not drink (like me) those little mini bottles are so darn cute!
Thanks for stopping by, make sure you head over to Cooking with Cricut and get in on this weeks challenge!
PS: Because I used my Pink By Design stamps I am also "linking" this up over at http://www.pinkcricut.com/ for this weeks link up party!
Have a crafty day!
Saturday, January 14, 2012
Day 1 of CWC 1st Blog Hop of 2012-Something Old, Something New, Something Borrowed, Something Blue!
Welcome to Day one of PaperCraftingWorld.com and CookingWithCricut.com’s first Blog Hop of 2012! Our theme is: “Something Old, Something New, Something Borrowed, Something Blue!”
If you have arrived here from Celeste's blog Touched by a Butterfly you’re in the right place! If you’re joining us mid-hop, head on over to see Melin at CookingWithCricut.com and start at the beginning so you don’t miss any of the wonderful projects the Designers have created!
Our Designers had to use something old from their craft stash, something new (a recent purchase or new technique), something borrowed (an element from a Cricut cut or from a PaperCraftingWorld.com cutting file or digi stamp) and of course, something blue.
Here is what I came up with . . .
I made these little favor bags for my former supervisors retirement party. Her assistant loved my Halloween goodies so he asked me to make something. For my old element I used my OLD Creative Memories Circle punch to punch out the circle sentiment after I printed them out on a sheet of paper on the computer. For something new I used my new scallop circle punch (I love this thing already), for something "borrowed" I used some baggies that were actually meant for jewlery, I was able to stuff some nuggets in there and for something blue I used blue paper as my scallop circle to put my punched out circles on. I used Cricut Art Philosophy for the bag toppers and I printed the labels for the nuggets right onto return address labels and put those on the nuggets! Everyone loved them, including my now former supervisor :)
Now head on over to Charlotte at http://www.alittlebitofdetail.blogspot.com and see what she’s created!
Make sure you check in tomorrow at CookingWithCricut.com and see what the Day Two Designers have cooked up! Thanks for stopping by and hopping with us! Have a crafty day!
Sunday, December 25, 2011
Day 25-MERRY CHRISTMAS! 25 Days of Christmas Crafting Fun!
Welcome to Day 24 of the 25 Days of Christmas Crafting Showcase. Today we are focusing on Jesus is the reason for the seanson! Make sure you stop by Cooking with Cricut to check out all of the designers wonderful projects today and each day during our showcase!
I made some goodies for my SOR (School of Religion Students).
I used Art Philosophy to cut the green fancy square at 4 inches, then I cut the white (using center cut because I printed the sentiment out on my computer) at 3.75 inches. I added the red faux stitching, used some brads to keep them together and added the candy cane for the J! The kids loved them.
I made some goodies for my SOR (School of Religion Students).
I used Art Philosophy to cut the green fancy square at 4 inches, then I cut the white (using center cut because I printed the sentiment out on my computer) at 3.75 inches. I added the red faux stitching, used some brads to keep them together and added the candy cane for the J! The kids loved them.
Don't forget to go back to Cooking with Cricut to see all of the great freebies and ideas shared by the other designers. You can also enter to win some great prizes! (Make sure you read the requirements for the giveaways completely).
Thanks for stopping by and have a craft day!
Tuesday, December 20, 2011
Easy Hot Cocoa Teacher Gifts
Hello all! I made these cute hot cocoa holders using the same theory as the gum advent calendars from Pink Cricut. This time I just sort of free handed it in terms of measurements.
Here they are:
I added two packs of hot cocoa, then I closed it, punched a hole and tied a ribbon through, I also added two small bags (I had the bags on hand) of marshmallows and put those through the ribbon and tied it closed. I then made a small tag and stamped it with my Pink by Design December Stamp of the Month set. Lastly, I cut out a gift card holder that I made using Cricut CraftRoom and Art Philosophy and put it on the back of the little hot cocoa book. Easy! The teachers loved these and I already received one thank you card for them! I have made 5 of these so far (my 3 year olds two teachers, my co-teacher for Sunday school and our two high school helpers). I plan to do at least 6 more once I get some more hot chocolate for the teachers at my sons school. I probably will not add gift cards to those because we do that as a class. Instead I think I may add two chocolate spoons. If I do I will add that in another post. Thanks for stopping by today!
PS: Don't forget to keep up with us over at Cooking with Cricut as our 25 days of crafting fun finish up this week :)
Here they are:
I added two packs of hot cocoa, then I closed it, punched a hole and tied a ribbon through, I also added two small bags (I had the bags on hand) of marshmallows and put those through the ribbon and tied it closed. I then made a small tag and stamped it with my Pink by Design December Stamp of the Month set. Lastly, I cut out a gift card holder that I made using Cricut CraftRoom and Art Philosophy and put it on the back of the little hot cocoa book. Easy! The teachers loved these and I already received one thank you card for them! I have made 5 of these so far (my 3 year olds two teachers, my co-teacher for Sunday school and our two high school helpers). I plan to do at least 6 more once I get some more hot chocolate for the teachers at my sons school. I probably will not add gift cards to those because we do that as a class. Instead I think I may add two chocolate spoons. If I do I will add that in another post. Thanks for stopping by today!
PS: Don't forget to keep up with us over at Cooking with Cricut as our 25 days of crafting fun finish up this week :)
Wednesday, December 14, 2011
CWC Weekly Challenge and Day 14 of 25 Days of Christmas Crafting Fun
Hello and welcome to the Wednesday weekly challenge over at Cooking with Cricut. Today we are focusing on simple cards, tags and other holiday goodies. I hope you will join us in the challenge!
I had a Holiday party to go to last weekend and wanted to make a little hostess gift. I had about an hour. I decided to make a little gift bag with some tags and candy in it. The tags would be for her to use later on her own Christmas gifts :) Hopefully making things easier on her.
Here they are:
I made 10 tags by cutting the tags in red paper (I actually used some 6X6 scraps I had and used my Creative Memories tag cutter but could have just as easily used Tags, Bags, Boxes and More or even Jolly Holidays to cut the tags. I then cut 10 trees (also using scrap paper but green this time). I used a to and from stamp on one side of the tag, then added the tree on the other. I then added some stars I had from Micheals Recollections brand and some "lights" using my iRock gem setter and some gems, I, however, could have just as easily added some adhesive rhinestones. Lastly I used my snow writer marker to add some snow at the bottom (because I love that thing, LOL). I added ribbon to each one and I was all set! I tied them all together and then cut a bag from Art Philosophy using fit to page and the size of the bag was perfect. I threw some dark chocolate Hershey kisses in the bottom, threw in the tags and was all set with my cute but thoughtful hostess gift :)
Thanks for stopping by today, make sure you go back to Cooking with Cricut and visit all of the designers today!
Have a craft day.
I had a Holiday party to go to last weekend and wanted to make a little hostess gift. I had about an hour. I decided to make a little gift bag with some tags and candy in it. The tags would be for her to use later on her own Christmas gifts :) Hopefully making things easier on her.
Here they are:
I made 10 tags by cutting the tags in red paper (I actually used some 6X6 scraps I had and used my Creative Memories tag cutter but could have just as easily used Tags, Bags, Boxes and More or even Jolly Holidays to cut the tags. I then cut 10 trees (also using scrap paper but green this time). I used a to and from stamp on one side of the tag, then added the tree on the other. I then added some stars I had from Micheals Recollections brand and some "lights" using my iRock gem setter and some gems, I, however, could have just as easily added some adhesive rhinestones. Lastly I used my snow writer marker to add some snow at the bottom (because I love that thing, LOL). I added ribbon to each one and I was all set! I tied them all together and then cut a bag from Art Philosophy using fit to page and the size of the bag was perfect. I threw some dark chocolate Hershey kisses in the bottom, threw in the tags and was all set with my cute but thoughtful hostess gift :)
Thanks for stopping by today, make sure you go back to Cooking with Cricut and visit all of the designers today!
Have a craft day.
Labels:
Art Philosophy,
Christmas,
iRock,
Jolly Holidays,
snow marker,
Tags
Monday, December 12, 2011
2 Liter Bottle Baby Shower Gift :)
I made a 20oz bottle into a little gift card holder a couple of months ago and had been wanting to do a 2 liter bottle and finally got the chance for my Aunt's baby shower this past weekend. Unfortunately I have been SO busy that I really only had about 45 minutes to get this together so it is "plain" but it did turn out cute.
Here it is:
I used some pink and purple paper which I wrapped around it (I took the label off and cut a hole like I did with the 20oz and how it was explained in the message board where my girlfriend first found this idea). I then added some ribbon that says OH BABY and ITS A GIRL around the top and bottom (I hot glued the ribbon). I then added some stickers that I had on hand and I made a gift card holder (using Cricut CraftRoom and the Art Philosophy cartridge) which I stamped with the cutest sentiment from My Creative Time's Many Greetings set, then I put a Target gift card in and stuck on the side of the bottle as well :) I put some socks, wash clothes, and small baby toiletry in the bottle. I added a ribbon bow to the lid and a baby rattle that looks like a diamond ring. Too cute, right! That is my new baby girl go to gift, that rattle is just too cute (I also got a purse one but it did not fit so I just gave it to her, LOL. I cannot wait to make one of these when I more time to plan it out and cut out some cute decorations for the bottle, but I am glad I had those stickers on hard and it feels good to use "old" stuff just sitting in my stash! TFL.
Have a craft day!
Here it is:
I used some pink and purple paper which I wrapped around it (I took the label off and cut a hole like I did with the 20oz and how it was explained in the message board where my girlfriend first found this idea). I then added some ribbon that says OH BABY and ITS A GIRL around the top and bottom (I hot glued the ribbon). I then added some stickers that I had on hand and I made a gift card holder (using Cricut CraftRoom and the Art Philosophy cartridge) which I stamped with the cutest sentiment from My Creative Time's Many Greetings set, then I put a Target gift card in and stuck on the side of the bottle as well :) I put some socks, wash clothes, and small baby toiletry in the bottle. I added a ribbon bow to the lid and a baby rattle that looks like a diamond ring. Too cute, right! That is my new baby girl go to gift, that rattle is just too cute (I also got a purse one but it did not fit so I just gave it to her, LOL. I cannot wait to make one of these when I more time to plan it out and cut out some cute decorations for the bottle, but I am glad I had those stickers on hard and it feels good to use "old" stuff just sitting in my stash! TFL.
Have a craft day!
Monday, December 5, 2011
25 Days of Crafting Fun Day 5
Hello and welcome to Day 3 of crafting fun with Cooking with Cricut. Make sure you stop by http://www.cookingwithcricut.com/ to get your frebbies, look at all of the amazing giveaways (please read the requirements to be entered for the giveaways) and great projects from the design team.
Today is all about candy canes, peppermints, etc. I was at the grocery store and saw these lollipops and just knew I had to do something with them so I picked up a few bags.
Using Cricut CraftRoom I used the same template that I used for my Thanksgiving Turkey name cards but made the base a little bigger and made a lollipop holder! (I had seen something similar but using a die on My Creative Time).
Here it is:
These will be from my boys to their classmates during the class Christmas party! I used the free digi stamp to decorate the tag (I used Tags, Bags, Boxes and More but you could use any tag). I used the print a contact sheet function on the picture wizard to get a bunch of the digi stamps small enough and to print all on one page of card stock!
If you use Cricut CraftRoom and would like the file I used email me and I will be happy to send it to you (you have to have the Art Philosophy cartridge to cut with it). My email is debbiebutcher at comcast dot net.
Thanks for stopping by and be sure to stop by Cooking with Cricut all month long for some crafty fun!
Today is all about candy canes, peppermints, etc. I was at the grocery store and saw these lollipops and just knew I had to do something with them so I picked up a few bags.
Using Cricut CraftRoom I used the same template that I used for my Thanksgiving Turkey name cards but made the base a little bigger and made a lollipop holder! (I had seen something similar but using a die on My Creative Time).
Here it is:
These will be from my boys to their classmates during the class Christmas party! I used the free digi stamp to decorate the tag (I used Tags, Bags, Boxes and More but you could use any tag). I used the print a contact sheet function on the picture wizard to get a bunch of the digi stamps small enough and to print all on one page of card stock!
If you use Cricut CraftRoom and would like the file I used email me and I will be happy to send it to you (you have to have the Art Philosophy cartridge to cut with it). My email is debbiebutcher at comcast dot net.
Thanks for stopping by and be sure to stop by Cooking with Cricut all month long for some crafty fun!
Sunday, December 4, 2011
Day 4-25 Days of Crafting Fun-Love Theme
Hello and welcome to day 4 of 25 days of Christmas Crafting Showcase at Cooking with Cricut. Today's theme is February and Love. I decided to get an early start on planning for my Valentine gifts for the teachers at my children's school. I used this super cute digi stamp which you can get at Cooking with Cricut to create a tube of love (also known as candy, LOL).
Here is my tube full of love (candy :):
I just used two 2X12 inch pieces of red paper for the rosette and then I cut a scalloped circle at 2.5 inches using Art Philosophy and then printed the digi stamp and used my circle punch to cut him out. Isn't he adorable. I hot glued it all together and then hot glued it onto my tube filled with red Rollo's (you could also do red M&M's or red Hershey kisses! I know I would be happy to receive one of these :)
Don't forget to go back to Cooking with Cricut and see all of the great freebies and ideas shared by the other designers and you can also enter to win some great giveaways (make sure you read the requirements completely).
Thanks for stopping by and have a crafty day!
Tuesday, November 22, 2011
So Thankful M&M Tubes
I purchased these clear tubes from SRM months and months ago with the best intent to use them...but they just sat on the shelf :) So I decided I wanted to make something small for my childrens teachers and admin school staff so I thought an M&M tube would be perfect! I of course decided to get started on it last night around 9:30pm...needless to say I was up LATE! I tried to make it as simple as possible. Here they are:
I saw a few templates online but I just decided to make my own. I used solid paper for the "holder", then added patterned paper to decorate it. I used patterned paper for the scallop circle and for the little circle to put on the lid as well. I used the Art Philosophy Cricut cartridge to cut the scallop at 2.25 inches. I used a creme colored cardstock to print the sentiment on (which I just came up with because I have NO Thanksgiving stamps for some reason). I used a scallop punch I had, I believe it is 2inches, to cut out the sentiment. I replaced Principal with teacher for that one and for the admin assistant I just put So THANKFUL for you. I also hot glued ribbon (I had some ribbon that said so thankful-perfect right and when I ran out of that I had some with leaves on it). If I had more time I probably would have added a turkey or something...maybe next time :)
If anyone is interested in the template I made, let me know and I will post it :) TFL!
I entering this into the following challenge(s):
I saw a few templates online but I just decided to make my own. I used solid paper for the "holder", then added patterned paper to decorate it. I used patterned paper for the scallop circle and for the little circle to put on the lid as well. I used the Art Philosophy Cricut cartridge to cut the scallop at 2.25 inches. I used a creme colored cardstock to print the sentiment on (which I just came up with because I have NO Thanksgiving stamps for some reason). I used a scallop punch I had, I believe it is 2inches, to cut out the sentiment. I replaced Principal with teacher for that one and for the admin assistant I just put So THANKFUL for you. I also hot glued ribbon (I had some ribbon that said so thankful-perfect right and when I ran out of that I had some with leaves on it). If I had more time I probably would have added a turkey or something...maybe next time :)
If anyone is interested in the template I made, let me know and I will post it :) TFL!
I entering this into the following challenge(s):
Labels:
Art Philosophy,
SRM tubes,
teacher gift,
Thanksgiving
Subscribe to:
Posts (Atom)