This is my personal blog that hopefully others will enjoy finding information on projects, ideas, etc. that I have created, scraplifted or borrowed :)
Showing posts with label stamps. Show all posts

Wednesday, June 28, 2017

Freshly Made Sketches Challenge 294

I have not made a card for a challenge in a LONG time but needed some thank you cards for the parents of my Girl Scout troop.  They were so generous at Christmas and end of the year and chipped in and purchased me gift cards and gave me other little gifts so I wanted to send them a note of thanks.  It is nice to get unexpected gifts 😊  I used Stampin Up's Sealed with Love stamp set and their Lovee Notes Framelits Dies.  I really enjoyed using them for the first time.  I used my vagabond to cut the framelits, which I have only used once, so it was a fun time using items that just sit around and never get used!

Here is their sketch design:


Here is my submission for the Freshly Made Sketches challenge #294:


Thanks for stopping by and feel free to join the challenge over at Freshly Made Sketches Weekly Challenge 294!  

Thursday, December 6, 2012

Altered CD Case

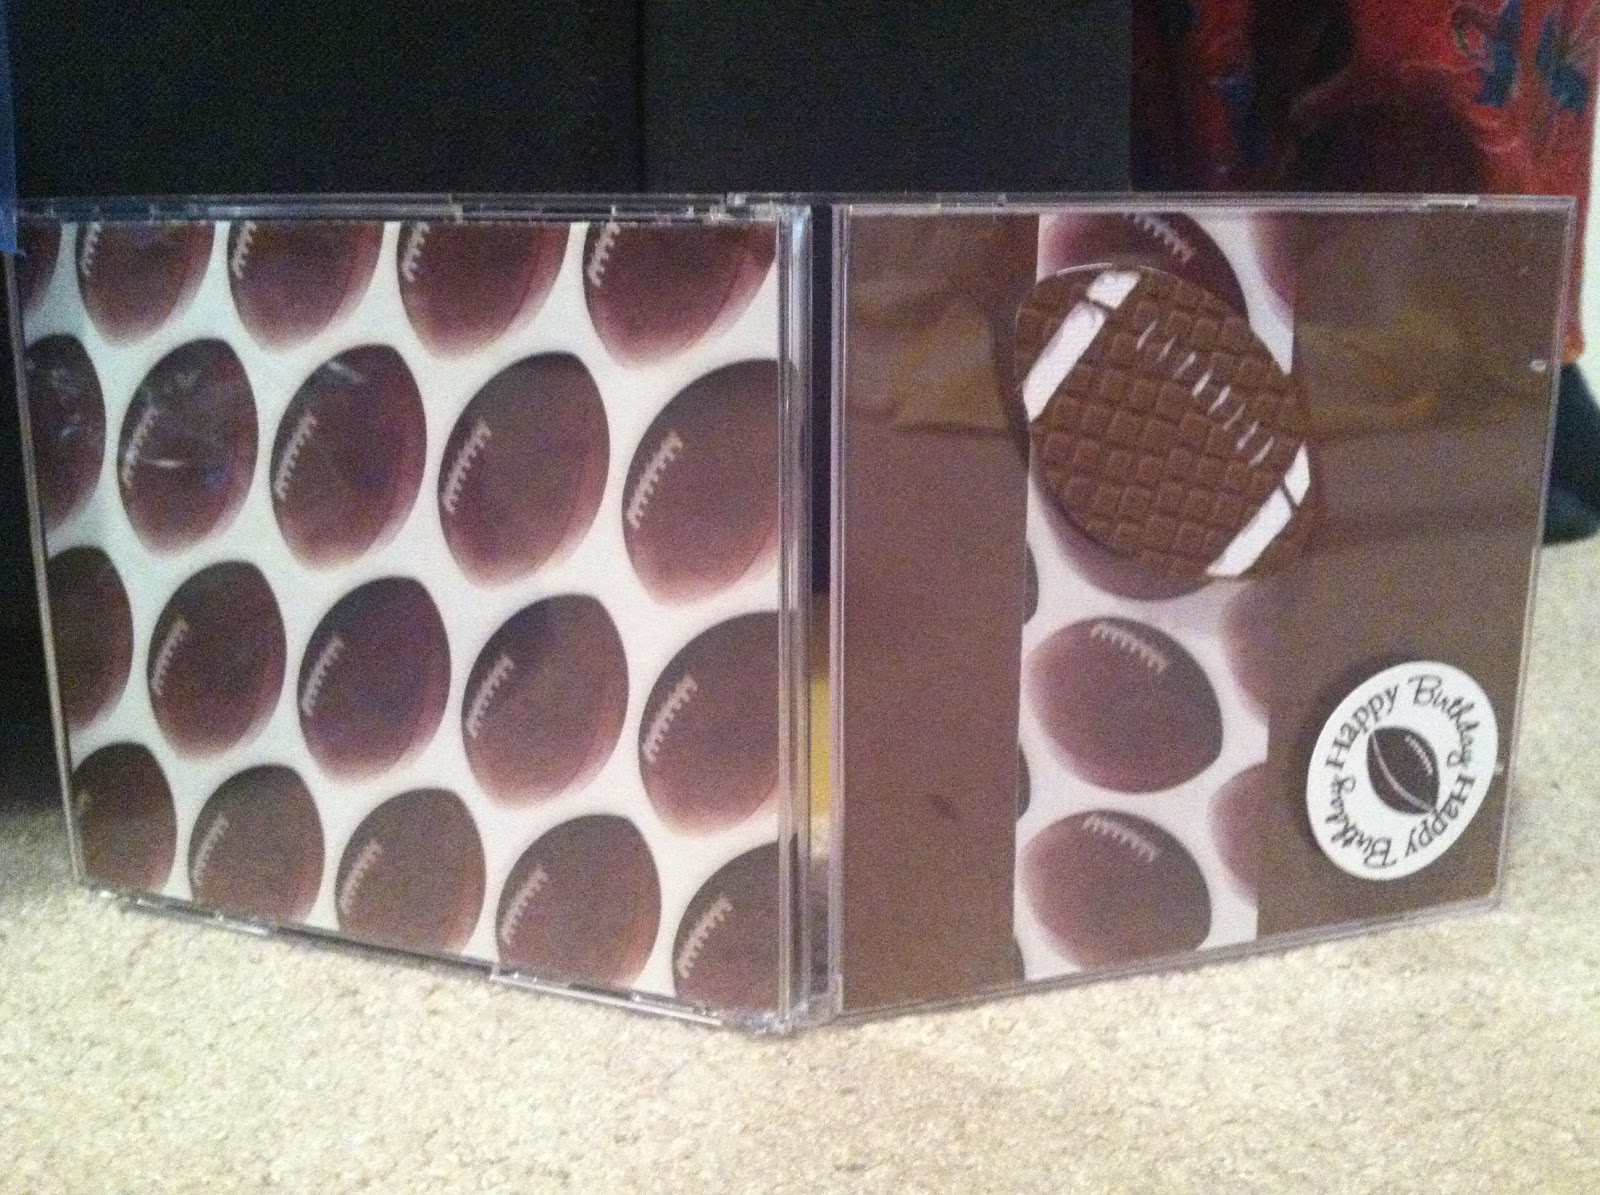
Hello!  My girlfriend Stephannie made me the cutest altered CD case with a Starbucks gift card in it (you can see it here) and she also gave me some empty CD cases to use myself so when I need a gift card holder for my son's good friends birthday I new I wanted to use one!  I used Stephannie's as inspiration.


I hand cut the paper just using the case for measurement for the front and back covers (put inside the CD case), I used some sports themed paper I bought years ago from AC Moore for the football patterned paper, then I cut the football for the outside from Sports Mania Cricut Cartridge and I embossed it used my Cuttlebug.  I used My Creative Time's All Around Birthday for the Happy Birthday circle stamp and then I used the football from My Creative Time's Touchdown stamp set for the center.   I used the My Creative Time's gift card die to cut my giftcard holder for the inside and stamped it with the Happy Birthday sentiment from the Gift Card Sentiment stamp set.  I added some faux stitching with my white gelly roll pen and some more of the football themed paper.   I used a few glue dots to stick the gift card holder on and filled it with a Sports Authority gift card (it is getting hard and harder to buy for my 11 year olds friends but they all love sports!).  I hope he liked it!

Thanks for stopping by, hope you have a craft day!

Thursday, August 23, 2012

Brownies and a cute plate from Pinterest!

Hello all.  I wanted to make some brownies for the nurses at my husbands Oncologist's office because they are so sweet and do such a great job of taking care of people all day each day.  He had to go in today so I made some chocolate chunk and peanut butter chip brownies.  I had recently seen this cute idea on Pinterest on how to upgrade a simple paper plate.  I used a cute ribbon I already had to make my plate cute and to tie the plastic wrap that I used for the brownies :)  I use my pizza cutter to cut the brownies to try to make them nice and sqaure :)


Then I used my My Creative Time XL Label Die and XL Label Borders stamp set to cute and stamp a cute tag.  I then used a cheapy $1 stamp for the thanks so much sentiment, I added a little to it with my white gel pen.

The nurses loved it and I even overheard one of them talking about how cute the plate was :)

Thanks for stopping by.  Have a crafty day!

PS:  I entering this over at My Creative Time's Pinterest inspired challenge (http://www.creativetimeforme.com/2012/08/new-challenge-host-emma-pinterest.html) and linking up over at Sarah Hamer designs http://www.pinkcricut.com/2012/08/link-tuesday-17/ ) .  Stop by and enter the challenge or link up too :)

Wednesday, February 8, 2012

CWC Weekly Challenge # 72-Grown-Up Valentines-Must use black and a brad!

Hello and welcome back for another CWC Weekly Challenge.  This weeks theme is a grown-up Valentine and you must use the color black and a brad.

So I have to admin I forgot about the brad but found the perfect place for it at the end of making my card.  I will giving this card to my hubby along with some cupcakes and beer (his favorite :)).

Here is my card:

The lighting is off for some reason but the paper is pink, dark/bright pink

I cut the black heart from Lyrical Letters, then I used some $1 stamps from AC Moore for the big white heart made of little hearts (I used a white ink pad and then sprinkled a little bit of embossing powder on it) and for the sentiments (did the same thing with them).  They are hard to see in the picture but you can see them in person.  I added a small piece of solid string to make a tiny little bow above the heart.

The cute cupcake bear is from Paper Crafting World and can be found for purchase here, I added the brad to the bow, I printed two prints and cut out the cherry, put some glossy accents on it then attached it with a pop dot, I also lightly added some purple stickles to the wrapper part of the cupcake and some pink stickles to the icing.

Thanks for stopping by this week, make sure you stop by Cooking with Cricut and see what all of the wonderful designers have created this week.

Thursday, December 1, 2011

Gum Advent Calendars

So on my way to take my boys to school (at a stop light) I see todays posting from Pink Cricut and think OMG, I HAVE to make these!  So today as soon as I get done with work (I work from home on Tuesday and Thursdays thank goodness) I quickly make them.  The boys LOVED them because they both love gum and this ensured they could have one piece at least for the next 24 days, LOL.  My one son does not like minty gum so I had to do his a little different to give him the Trident he likes but it still worked! 

Here they are:


I used a Marth Stewart corner and edge punch for the top/side edges.  I used Pink By Designs November stamp of the month set and die for the front...isn't it perfect!  It was SUPER easy but so darn cute!  I only used 1 sheet of patterned paper and some white scratch paper for the sentiment and for the paper to hold the trident (I just stuck it on the paper with the opening side facing up so that my son could still open the gum without having to remove it from the paper).  You certainly could make yours prettier but pretty is usually lost on my boys so I went with simple :)

Now, if you want to know how to make one, stop over at Pink Cricut and watch Sarah's tutorial! 

Wednesday, November 30, 2011

CWC Wednesday Challenge-Candles, Wreaths and/or Pine Cones!

Hello, welcome back for another Cooking with Cricut Wednesday Weekly challenge! This weeks theme is candles, wreaths and/or pine cones.  I decided to make some Christmas tags for gifts when I finally get around to wrapping them :) (which is usually last minute).

Here it is:


I used my Jolly Holidays cartridge for the tag (green and red layers) and the wreat (green and red layers again) and cut them at 3 inches I believe.  I added some stamps that I had from a $1 stamp set, some white jelly roll pen stitching and a little bling to the wreath and the stamp (there was a stamped star there already but I wanted to add my blingy star instead) :)  I plan to make a few more like this and maybe some with a snowman on them...I will post those in another post when they are done :)

Now it's your turn! I hope you will head on over to Cooking with Cricut to enter your project!  TFL.


Have a crafty day!

Monday, November 7, 2011

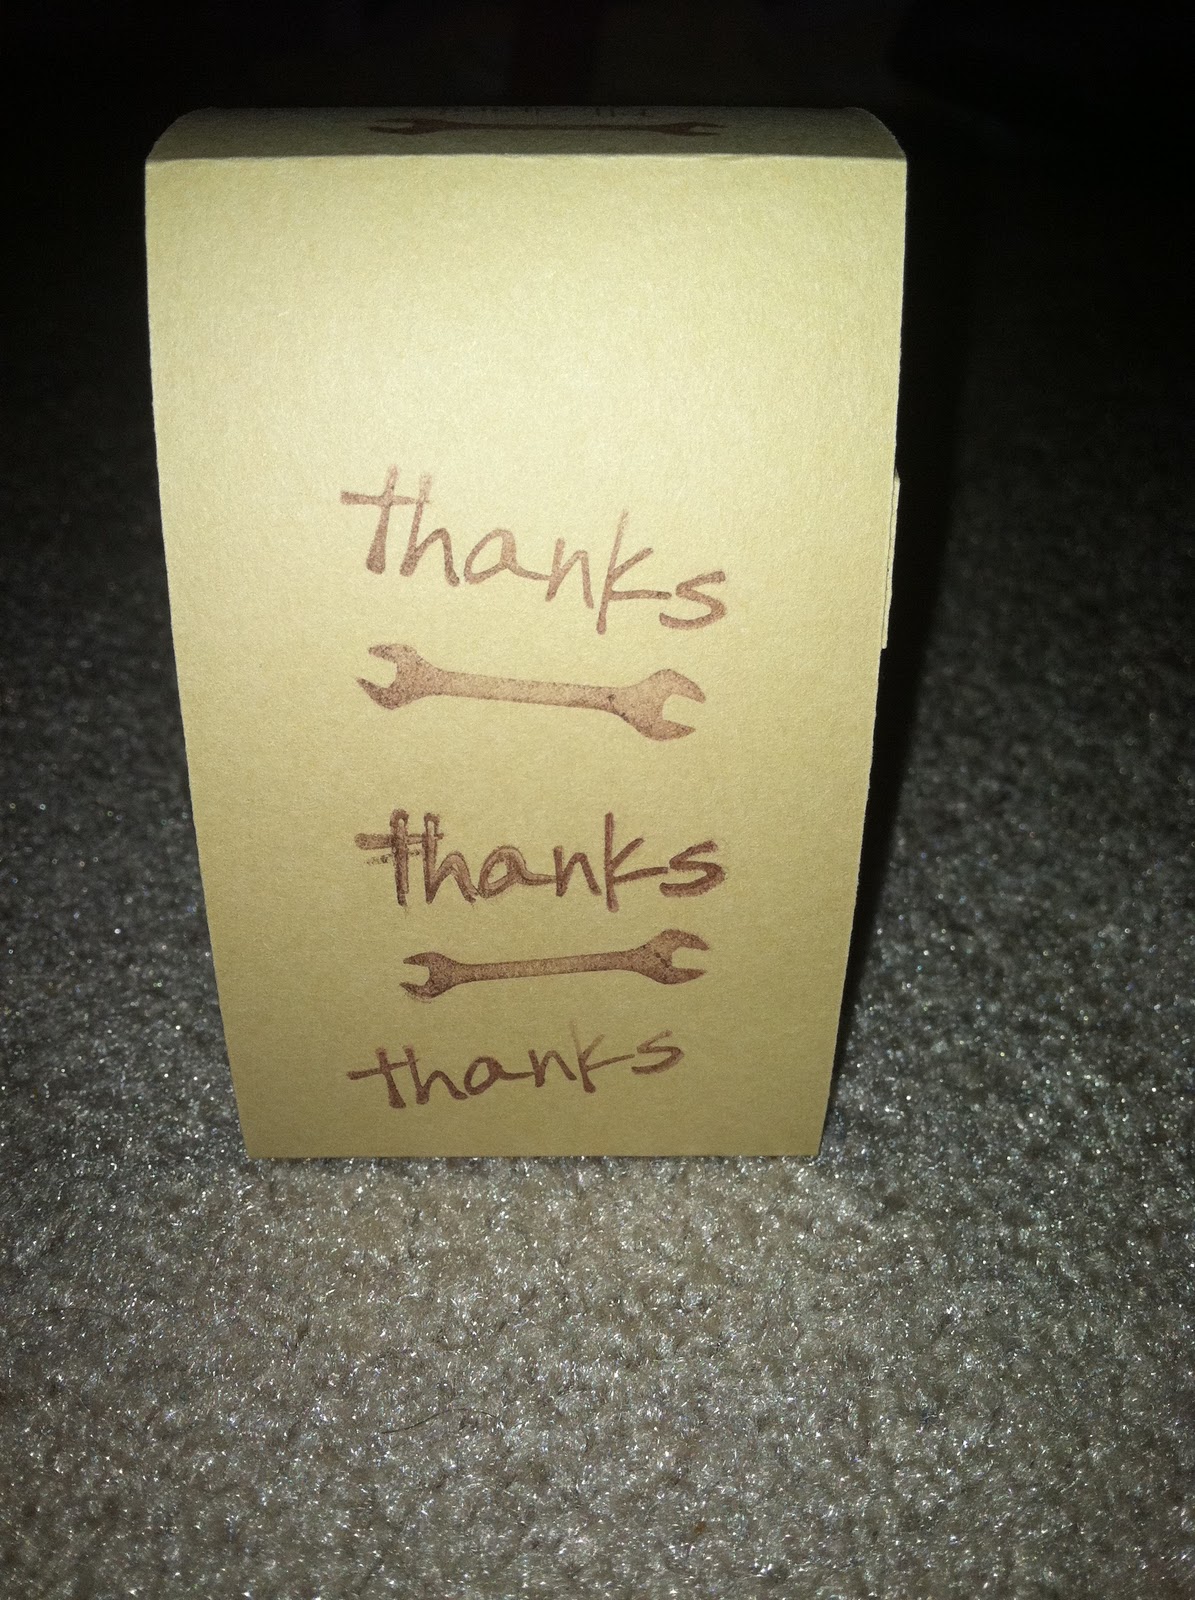
A Funny Little Gift-A 5 Hour Energy Holder

A little over a week ago I had to arrange for the clearing out of an old copy room to begin some construction for a new office space (I am in administration and this is one the least favorite parts of my job :).  There was a very old lab fridge and freezer in the space.  Unfortunately before they could be disposed of they had to be defrosted...they were GROSS!  Luckily some of my co-workers offered to help.  One guy even did most of the work on the freezer.  I know he loves those 5 hour energy drinks so I decided to get him one and knew I could make a little holder like those hand sanitizer holders I did last year at Christmas (found that idea online).  I had to make some measurement changes but it was actually easier than I thought.  I decided to use my Pink by Design Just 4 Men stamp set to stamp all over the holder with some of the different sentiments (note to self, do this before folder and adhering next time :).  I also had a cheapy little $1 set that had a wrench and another with the word thanks so I used those little stamps too.  I wrote a little note of thanks on the inside.  Nothing fancy but I think it is cuter than just a thank you card :)  TFL.


Sunday, November 6, 2011

Quick Thank You cards

I needed a few quick thank you cards for some folks at work for helping with a task really outside of any of our job descriptions (other duties as assigned does not even really cover it, LOL) and also for a Lab Chief-Scientist (I am in administration) who took my and a few of my staff on a tour of his lab so we could see the science side of things!  I am super tired from the time change, busy weekend and a non-sleeping daughter who likes to wake me up every night so I just wanted to do something quick.  I picked two colors and some stamps from my cheapy $1 stamps and came up with this card.  I then decided to add some pearls to all of them (my FIRST time using them) and some ribbon (only to 2 of the 4 because I could not decide if I liked it).  I think they will do just fine for what I need, TFL :)  Hope everyone had a great weekend!


Thursday, October 27, 2011

Halloween Goodie Bags for Preschoolers and Teachers :)

Hello.  I saw these adorably decorated crayon boxes over on a My Creative Time designer's (Cathryn) blog http://inthepinkcathryn.blogspot.com/2011/07/my-creative-times-july-stamp-release.html back in July and immediately bought the stamp set with the intentions of doing this (a similar version of it) for my daughter's preschool class.  Then a couple of weeks ago I was in Target and saw cute little Halloween notepads in the $1 section (6 in a pack) so I bought those also.  I decided this week to put them in with the crayons to make a goodie bags...of course that meant I needed toppers.  I also decided to make some goodie bags for her two teachers using an idea I had seen around on Pinterest and other sites. 

Here are the bags for the kids:  For the crayons I used the My Creative Time all around Halloween set, some plain paper from AC Moore and some patterned paper from K&Co.  For the bag toppers I used Art Philosophy to cut the square in 2 sizes, then I scored it in the middle.  On the top layer I added stitching via gelly roll pens, either a ghost from Paper Doll Dress-up or a pumpkin from Create a Critter.  Of course they needed a cute little Peachy Keen face :)  I printed the names all one piece of card stock on the computer then cut out using the center point feature and one of the cute tags on Art Philosphy.  I then used the Happy Halloween sentiment from my Pink by Design Guess Who set to add the sentiment.  Lastly, I used the bonus stamp that came with Septembers new order stamps from My Creative Time on the back of the bags :)


Here are the bags for the teachers:  I used the same process for the bag toppers as above but I printed the sentiment on orange paper first, then cut the square using Art Philosophy.  I then cut the ghosts from Paper Doll Dress-up and used some cute Peachy Keen faces on them.   I plan to make some of these for my office staff as well this weekend for Monday.


I hope the kids and teachers enjoy their goodie bags!  TFL!

Tuesday, October 25, 2011

My Creative Time Design Team Call

Hello.  I have decided to take a chance at the design team call for My Creative Time, I think my work is a bit subdued or simple compared to their current design team who are totally awesome but I thought I would give it a try anyway :)  I made this card using their Game Night set.  The card is for my mom.  She loves bingo and cards so this set showing a lucky winner on both the bingo (by adding bling) and the cards (added some stickles) shows her how lucky we are to have her!  I think she will love it.  I plan to give it to her along with the cheesey gifts we brought her back from Florida.  I used Art Philosophy for the stars, I used the center cut feature after I printed the sentiment out from my computer.  I also embossed and inked my white background sheet.   I added some ribbon and bling and there it is!  TFL.


Thursday, October 13, 2011

Small Thank You Gift

I saw these cute little pencil "flowers" on My Creative Time yesterday and knew right away I needed to make these!  The Administrative Assistant/Secretary at my boys school is so helpful and she recently helped me out big time with scheduling their parent teacher conferences around a work meeting I have I wanted to let her know how grateful I was.  I made these three pencil flowers by cutting this border using the fit to length at 11 inches from the Art Philosophy cartridge (I think it is just like Emma did at My Creative Time but could be off a little, it still worked).  Then I scored, glued, hot glued to a scallop circle I also cut from Art Philosophy at 1.75 inches, used some twine in the buttons then hotglued them on as well.  Lastly, I put a little hot glue on the pencil and stuck it in/on the back.  I had this little box already cut (take out box that I cut the flaps off of) so I put some little clear rocks in and stuck the pencils in.  I tied some twine around, then cut this little label/tag from Art Philosophy and stamped it with Thanks a Bunch from My Creative Time's Many Sayings set.  I dropped it off today and she loved it.  I had my boys take it in but she had to come out to the car to tell me how much she loved it :)  I am sure I will be doing some more of these, Christmas ones would be adorable!  TFL.


Wednesday, October 12, 2011

Cooking with Cricut Design Team Day-Cake, Cupcake and or Teddy Bear Challenge

Hello everyone.  Today is Cake, Cupcake and/or Teddy Bear Challenge Day over at Cooking with Cricut!  As you may have noticed from this post and the cute little button on the right side of my blog I am now officially a member of the Cooking with Cricut Design Team!!!!  Yeah!  I am super excited to join this group of talented crafters and even more excited to be participating in my first challenge as a design team member! 

For this weeks challenge I made a cute little take-out box adorned with the cutest little cupcake (this is for my 8 year old niece).  I used the Art Philosophy cartridge for the box and the cupcake, I then embellished the cupcake with stickles and a cute little Peachy Keen face.  I also used a happy birthday stamp from My Creative Time to stamp all over the box.  Lastly, I wrapped some twine around the box and tied two bows (because I used two different colors of twine so I did one bow for each one). 

My 3 year old helped me pick out the contents for the little box.  She picked out 3 little bears in her favorite colors of pink, purple and green :), then we added some lip gloss because what little girl doesn't love lip gloss.  In the end I decided to punch two holes, one on each side of the box, and tied a ribbon through so I could attach it to the mini pillow pet we also purchased for my niece.  I hope she loves it :)

Now it's your turn!  I hope you will head on over to Cooking with Cricut  to enter your project!  TFL.

Have a crafty day!


Tuesday, October 11, 2011

Halloween Bash Door Hanger Invitations

I knew I wanted to make door hanger invitations for a little Halloween Bash I am planning for the little neighborhood kids but was not sure what to do...then I bought Art Philosophy.  Wow, that cartridge has EVERYTHING on it.  The door hanger on it is actually a little pocket which has endless possibilities but for now I just needed it for an invitation!  I used patterned paper from a K&CO. stack and some solid white and orange paper I had already for the invitation information (I printed the information out on the computer and mounted it to the orange card stock).  I used my Pink By Design stamp set Guess Who for the stamps of the cute little trick or treaters and the sentiments (Happy Halloween on the front, Boo, Got Candy? and witchy wishes on the back).  I used colored pencils, a gelly roll pen and stickels to add some color to the trick or treaters.  I will add a couple of pieces of candy in the little pocket (at least 1 piece for each child in the house I am dropping the invitation off at).  I cannot wait to deliver them!  TFL.

The flowers are just to block personal info :)
 
This one was a cheapy stamp from
Michaels that I crossed out the
word scary on and wrote cute
because this is for small kids,
I also added some rhinestones for
the eye and the bow

Wednesday, September 28, 2011

Cricutless (dare I say that) 40th Birthday Card

I made this card for my SIL for her upcoming 40th birthday.  As you may seen me mention my hubby and I are going away (kidless) next week and her party is the day we come home so I had to go ahead and get it done.  I LOVE LOVE LOVE pink and green and I had this new adorable paper pack from Recollections so I had to use it.  I used the My Creative Time Make a Banner set for the banner, I stamped the green paper with the polka dot stamp then I embossed it (hard to tell from the pic) then I used some super old stamps I had in my stash for the 4 and 0.  I used twine to "hang" the banner.  I used one of the stamps from my new Close to My Heart stamps for the cupcake, cut it out then added a twine bow to accent it.  The two sentiments in the box are both from the Close to My Heart Many Greetings set.  I hope she likes it!  TFL.


Monday, September 26, 2011

Halloween Crafts-Pencils and Pillow boxes!

There are SO many Halloween craft ideas out there, my head is actually so full I am sure it would take me years to make all of the ideas in there!  My girlfriend and I decided to have a Halloween Craft Day at her house to make some.  I wanted to make something for my Sunday School students that did not involve candy.  So I decided to do a pillow box with erasers in it and a pencil going through it.  I used some patterned paper from K&Co., solid color paper from AC Moore (a trick or treat paper pack), some ribbon from AC Moore, Michaels and Joanns and a Happy Halloween stamp from the Guess Who set at Pink by Design.  I used my new Art Philosophy cart to cut out the pillow boxes and the tags.  Here is the assortment.  TFL :)


Wednesday, September 21, 2011

Anniversary Card for My Hubby

My husband and I will be celebrating our 10 year wedding anniversary at the end of the month, we will be taking a 1 week trip to Naples, Florida (stopping in Savannah and Orlando on the way) to celebrate.  This will be our first time away from the girls and our first time away from all of them for so long.  Luckily my Mom is coming to stay at our house to take care of everyone.  I wanted to make my hubby's card this year so I decided to go ahead and get that out of the way.

I just picked up my Art Philosophy-Close to My Heart bundle over the weekend and KNEW it would be perfect.  I used the chip board accents for the banner, I then cut out the paper to go on top from the cartridge.  Next I used some stamps I received as a part of my purchase (love FREE stamps).  Those stamps were A Typeface for the I and U, Pair-a-Phrase for the heart and Frames, Tags and Borders set for the U and me 4 ever ticket (I cut the paper out using the cartridge).  Although the color combo is not something I would normally do I had already gone with the yellow and orange before I decided I wanted a pattern paper and I found this heart paper in a DCWV stack I had (thanks Steph) called Madly in Love so I wanted to use it and I think it all works.

I inked the banner by rubbing a cottonswab with in over it and rubbed the edges, just so it did not look so "clean", I used red stickels for the heart and I used my recollections heart edge punch on the bottom. 

I hope my hubby loves it (along with his new smoker grill :)  TFL.