My youngest niece turned 4 this week and my children were invited to lunch and bowling at their Country Club for the afternoon. I wanted to make here a cute card and love this set from The Stamps of Life. I do not like hand cutting out images so instead of their bee stamp I used Create a Critter to cut a cute bee for the card! I gave her a cute Peachy Keen Princess face and an action wobble to finish her off. The card was quick and cute! Just what I needed. My girls love playing with her before we gave it away :)
Thanks for stopping by, hope you have a craft day!
PS: I am linking up over at Sarah Hamer Designs so stop by and link up too! http://www.pinkcricut.com/2013/01/link-tuesday-33/
This is my personal blog that hopefully others will enjoy finding information on projects, ideas, etc. that I have created, scraplifted or borrowed :)
Showing posts with label Create a Critter. Show all posts
Thursday, January 3, 2013
Thursday, November 1, 2012
Happy Halloween!
Hello all. I hope everyone had a great Halloween. We just survived Hurricane Sandy. We were very lucky here in central MD to not get much (we had worse back in July with the Derocho storm). We actually did not lose power which is amazing for us, we usually lose it for 4 days at a time. I think we were better prepared this time. Unfortunately, folks to the east and north were not so lucky. We are praying for a quick recover for them all.
This year for Halloween I made two crafts (I still need to do something for my 3 year olds preschool class but have until next week :)). First, I made cute little bats with a fun size Hershey bar in them for my 4 year olds pre-k class because she dressed as a bat :) I used the Artiste cartridge for the bat, a circle punch for the face and some papers I had left over from last year. For the face, I used a Peachy Keen set called Monster Mash (I combined a mouth and eyes from different stamps in the set because I did not want my bat to look mean:) I had my daughter write her name on the inside and I used a ribbon that can easily be slid off to keep them closed.
Here are my bats and my cute little bat (I hand cut her mask because we could not find a bat costume):

This year for Halloween I made two crafts (I still need to do something for my 3 year olds preschool class but have until next week :)). First, I made cute little bats with a fun size Hershey bar in them for my 4 year olds pre-k class because she dressed as a bat :) I used the Artiste cartridge for the bat, a circle punch for the face and some papers I had left over from last year. For the face, I used a Peachy Keen set called Monster Mash (I combined a mouth and eyes from different stamps in the set because I did not want my bat to look mean:) I had my daughter write her name on the inside and I used a ribbon that can easily be slid off to keep them closed.
Here are my bats and my cute little bat (I hand cut her mask because we could not find a bat costume):
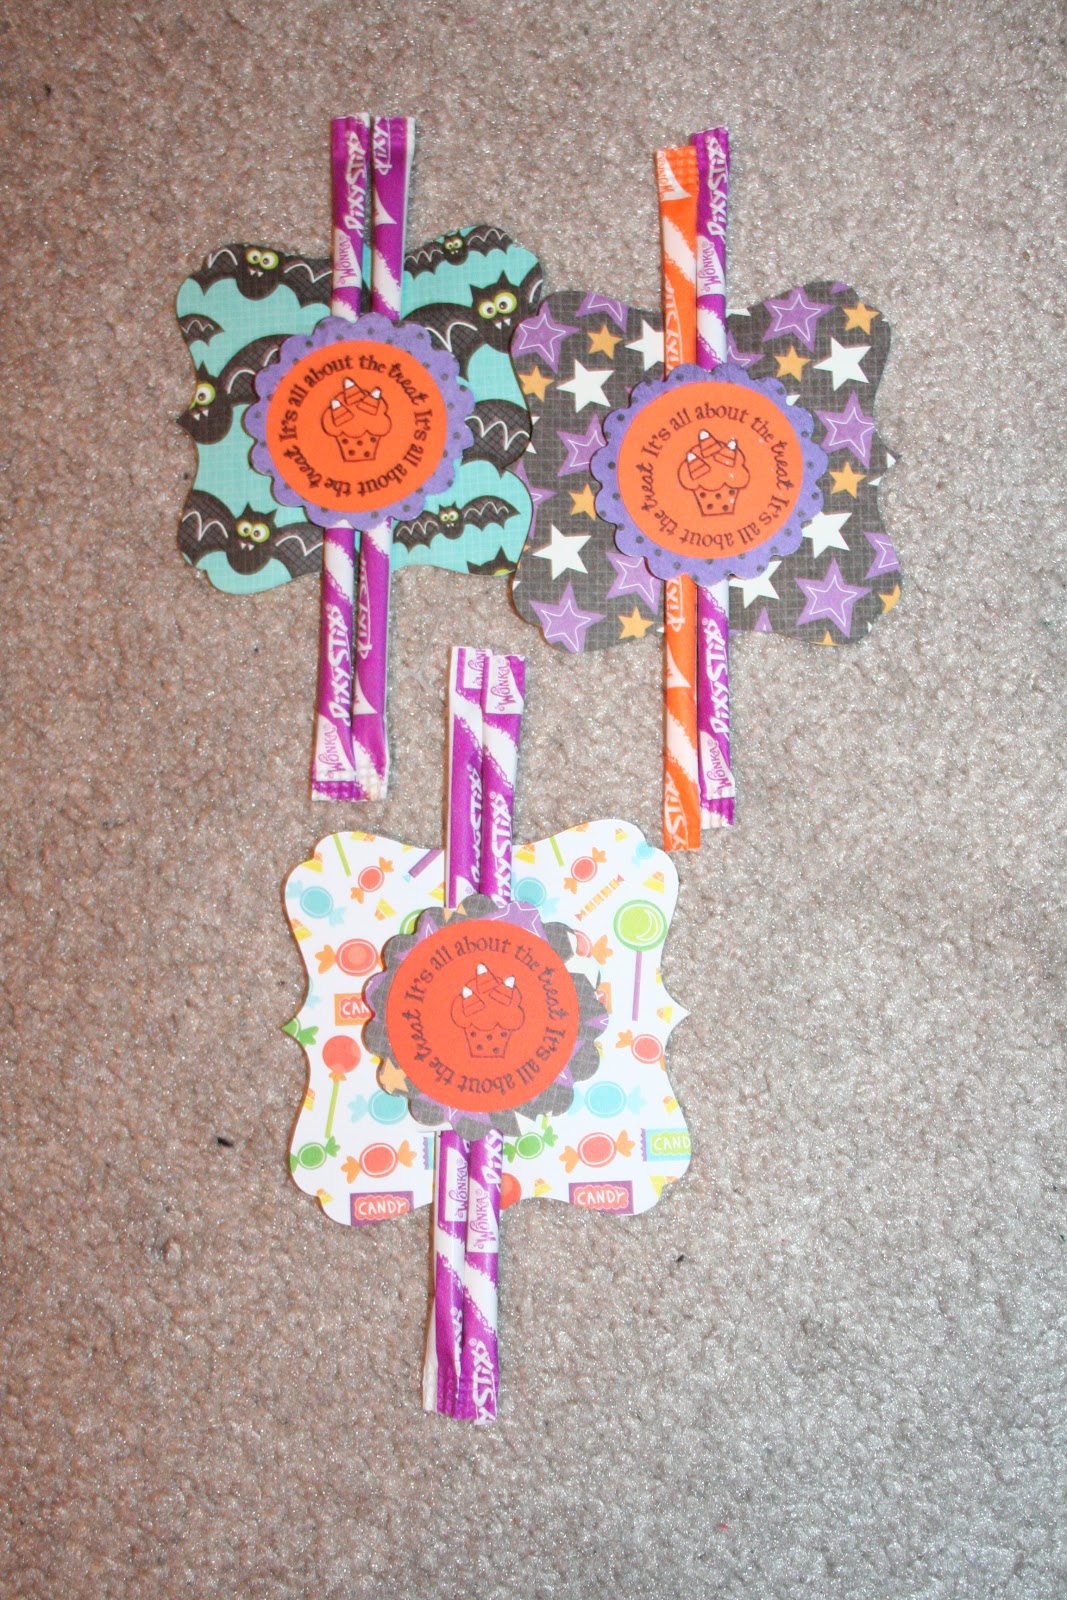
For my boys (9 and 11) I used this post from My Creative Time for inspiration and did some cute little cuts from Art Philosophy (I could cut 9 at a time versus using a die to cut one at a time) and put some pixie sticks through added a cute little Halloween sentiment from My Creative Times All Around Halloween set.
Here are those cute treats:
Lastly, for Halloween I made some costumers or parts of costumes. For my 3 year old she wanted to be a bat and I am not a sewer so I decided to do hers out of paper. I used the Art Philosophy for the tear drops which I then turned upside down. I used Create a Critter for the owl which I had cut down to make into a mask and added some circles and small feathers and an elastic band to make into a mask. She loved it and luckily it survived. Of course she has to wear it next week to preschool because her class Halloween event was cancelled this week due to the Hurricane so I hope it makes it until then! I also made my 9 year old sons Jayson Werth beard using a picture, some cardstock and some elastic. Here is a picture of the two cuties:
My oldest wanted to go as the Sun Drop guy (have you seen those soda commercials, he walks around dancing which cracks my son up). All I had to do for him was make an iron on since we did not have a Sun Drop t-shirt. It worked ok but I did not have the iron on for dark colored shirts so it is not that visible via picture. Here is my handsome guy:
WOW! That was a lot in a few days of work! I guess now it is onto Thanksgiving and Christmas! Thanks for stopping by. I hope you have a crafty day.
PS: I am linking up over at Sarah Hamer Designs, stop by and link up too! http://www.pinkcricut.com/2012/10/link-tuesday-25/
Friday, June 8, 2012
End of Year Teacher Gifts From My Boys
Today is the last day of school for my boys (5th and 3rd grade) so I had to get those teacher gifts done! I always do one for each homeroom teacher and the Principal and school Secretary. I also did one for my older sons religion teacher because he has her every day. They are almost the same as I did for my daughters preschool teachers except for these I had cute wicker bags I found at Target for $2.50. I bought them probably 2 months ago and luckily used them (most things I buy just keep sitting here :)

I added a beach towel, two puzzle books, a pen and pencil, sunglasses, a water bottle and a spray bottle to each bag (most items were from the $1 store or $1 section). I printed the tags on the computer and then cut the suns from Create a Critter.
I also used some cards I made using the One Sheet Wonder like I did for my daughters teachers. I used Pink By Design stamps, Our Teachers and Big Thoughts, for the sentiments on the cards.
The school has been so wonderful since Ryan (my oldest-11 years old) started in kindergarten when he was 5 and they have especially been so caring and generous over the last few weeks since Ed received his cancer diagnosis so this is really the least I could do for them. My 8 year old Kyle even told me last night that he did not want school to end because he would miss his teacher so much and that she is like a second mom to him. I really could not ask for more. :)
Thanks for stopping by and have a crafty day!
I added a beach towel, two puzzle books, a pen and pencil, sunglasses, a water bottle and a spray bottle to each bag (most items were from the $1 store or $1 section). I printed the tags on the computer and then cut the suns from Create a Critter.
I also used some cards I made using the One Sheet Wonder like I did for my daughters teachers. I used Pink By Design stamps, Our Teachers and Big Thoughts, for the sentiments on the cards.
The school has been so wonderful since Ryan (my oldest-11 years old) started in kindergarten when he was 5 and they have especially been so caring and generous over the last few weeks since Ed received his cancer diagnosis so this is really the least I could do for them. My 8 year old Kyle even told me last night that he did not want school to end because he would miss his teacher so much and that she is like a second mom to him. I really could not ask for more. :)
Thanks for stopping by and have a crafty day!
Wednesday, February 22, 2012
Cooking with Cricut Weekly Challenge-Birthday and Cake, Balloons or Cupcakes
Hello and welcome to another Cooking with Cricut Weekly Challenge. This week the theme was birthday but you also had to include either a cake, cupcakes or balloons.
I chose balloons (I used Create a Critter for the balloons) :) I just love the colors pink and green together too so I used those colors for my card.
Here it is:
I had to add some cute Peachy Keen faces and the sentiment is from My Creative Time.
Now I hope you will stop by Cooking with Cricut and see what all of the designers have come up with this week and join us in the challenge!
Thanks for stopping by, have a crafty day!
I chose balloons (I used Create a Critter for the balloons) :) I just love the colors pink and green together too so I used those colors for my card.
Here it is:
I had to add some cute Peachy Keen faces and the sentiment is from My Creative Time.
Now I hope you will stop by Cooking with Cricut and see what all of the designers have come up with this week and join us in the challenge!
Thanks for stopping by, have a crafty day!
Saturday, January 21, 2012
Cute Elephant Birthday Card
My girlfriend loves elephants so I wanted to make her a cute card for her birthday. Of course I had to use the elephant on Create a Critter because it is too cute! I also used Create a Critter for the balloons and party hat, then I added some twine for the balloon strings, some ribbon across the bottom, a cute Peachy Keen face stamp, a gem to the hat and that was it! I can't believe I actually got it in the mail on time, LOL.
Thursday, November 24, 2011
Turkey Tshirts for my girls
So I had seen t-shirts similar to this in 2 places over the last week and knew I wanted to make some shirts similar to those for my girls (I saw them here and here. After work today (I got off 2 hours early-YEAH) I took the girls to Joann's and they picked out the brown fabric and the ribbon. I also picked up some heat and bond and some fabric glue. Then we went to AC Moore and they picked out their t-shirts (the pink was a real surprise...NOT). After they went to bed I got started and here is what the finished product looks like:
I used Create a Critter to cut a paper template of the body, then I used it to cut out the fabric (by hand), then I put the heat and bond on it and set it aside. I used the paper template to help me use the fabric glue to glue on the ribbon, then I added the body and ironed it on (I did end up using some fabric glue around the edges too because I did not want to sew anything). I used the fabric glue to add some googly eyes, a hand cut (from scrap fabric I bought at AC Moore for $1 each) a beak and the waddle. Lastly, I used my new iRock (did I mention I LOVE it) to give this turkey some cute blingy legs :) I would have loved to add a Happy Thanksgiving or Happy Turkey Day sentiment but I ran out of energy...I think these will be just cute enough anyway :) TFL and Happy Thanksgiving!
Saturday, November 19, 2011
CWC "Giving Thanks” BLOG HOP
Welcome to WorkinScrappinMomof4 and the CookingWithCricut.com “Giving Thanks” Blog Hop! If you've come from visiting Jill at http://www.jaihartjustlovelydesigns.blogspot.com/, you're in the right place! If you've just happened across my blog and would like to hop along with us, you can go to CookingWithCricut.com and start at the beginning.
Today’s hop is all about Thanksgiving decorations – for your home and table.
For my project I decided to do some table decorations to go along with my centerpiece and my wreath I have made already :) These little place setting/name cards can also "hold" something. For now I filled one with a napkin and plastic silverware but will put a nice napkin and some "real" silverware in Thanksgiving morning for our breakfast (we are hosting breakfast at our house for my in-laws and eating out (Cracker Barrel-YUM) for dinner with my family. Here they are:
I used Art Philosophy and Cricut CraftRoom to create my holder (welded some shapes together :). I used it for the tag for the names also. I used Create a Critter for my cute turkey. I added a few gold details to him (features and stitching on his hat). For the girls name cards I added some gems to the turkey feathers using my brand new iRock which I LOVE!
For this blog hop I will be giving away a $15 gift certificate to Pink by Design Stamps! What is better than picking out your own prize, right! To be eligible you need to leave a comment on this blog post by 11:59pm Monday, November 21st. I will draw and post the winner Tuesday morning. The winner will then have until Monday, November 28th to get in contact with me to claim their prize! Good luck.
Now it's your turn! Link up your Thanksgiving project at CookingWithCricut.com. Here are a few guidelines:
Must follow the challenge topic and use one of the free files provided at CWC.
Must be a NEW project for this challenge. No back dated posts please.
Must have a link back to this post on your blog.
Must link your project post through Inlinkz and not just your blog.
Must use your Cricut in some capacity.
Must HAVE FUN!
You may gladly combine challenges . . . we love to pile it on TOO!
The Design Team will pick their three favorites and one lucky person will be chosen randomly to win one of the prizes being offered in this hop. There is also a prize for just leaving us a comment on the CWC blog. One catch, those leaving comments MUST be a CWC follower. Each prize winner will receive a $10 gift voucher-download from PaperCraftingWorld.com.
Now head on over to see Michelle at http://michelles-crafty-creations.blogspot.com/ to see what she's cooked up for you!
Have a very Happy Thanksgiving!
I will be entering this project in the follow challenge(s):
Today’s hop is all about Thanksgiving decorations – for your home and table.
For my project I decided to do some table decorations to go along with my centerpiece and my wreath I have made already :) These little place setting/name cards can also "hold" something. For now I filled one with a napkin and plastic silverware but will put a nice napkin and some "real" silverware in Thanksgiving morning for our breakfast (we are hosting breakfast at our house for my in-laws and eating out (Cracker Barrel-YUM) for dinner with my family. Here they are:
I used Art Philosophy and Cricut CraftRoom to create my holder (welded some shapes together :). I used it for the tag for the names also. I used Create a Critter for my cute turkey. I added a few gold details to him (features and stitching on his hat). For the girls name cards I added some gems to the turkey feathers using my brand new iRock which I LOVE!
For this blog hop I will be giving away a $15 gift certificate to Pink by Design Stamps! What is better than picking out your own prize, right! To be eligible you need to leave a comment on this blog post by 11:59pm Monday, November 21st. I will draw and post the winner Tuesday morning. The winner will then have until Monday, November 28th to get in contact with me to claim their prize! Good luck.
Now it's your turn! Link up your Thanksgiving project at CookingWithCricut.com. Here are a few guidelines:
Must follow the challenge topic and use one of the free files provided at CWC.
Must be a NEW project for this challenge. No back dated posts please.
Must have a link back to this post on your blog.
Must link your project post through Inlinkz and not just your blog.
Must use your Cricut in some capacity.
Must HAVE FUN!
You may gladly combine challenges . . . we love to pile it on TOO!
The Design Team will pick their three favorites and one lucky person will be chosen randomly to win one of the prizes being offered in this hop. There is also a prize for just leaving us a comment on the CWC blog. One catch, those leaving comments MUST be a CWC follower. Each prize winner will receive a $10 gift voucher-download from PaperCraftingWorld.com.
Now head on over to see Michelle at http://michelles-crafty-creations.blogspot.com/ to see what she's cooked up for you!
Have a very Happy Thanksgiving!
I will be entering this project in the follow challenge(s):
Labels:
Art Philosophy,
Cooking with Cricut,
Create a Critter,
iRock
Wednesday, November 16, 2011
CWC Wednesday Challenge-Lets Talk Turkey!
Hello, welcome back for another Cooking with Cricut Wednesday Weekly challenge! This weeks theme is Lets Talk Turkey! I decided to make a fall wreath for my front door.
I used a few pieces of paper (5 12X12 sheets for the actual wreath, that is IT!) from the Fall Stack from Recollections. Then I cut the turkey using some solid cardstock and some patterned pieces from the same card stock stack for the turkey (I used Create a Critter to cut him and his layers). Then I added some googly eyes and a little gold pen for some feathers and to outline his hat. The Give Thanks is also from the Recollections stack, there was a sheet with a bunch of sayins and journaling boxes and I thought this one was perfect for my wreath. I used some ribbon I bought at Joanns for $1 to hang the wreath! I think it turned out cute and my kids love seeing it on the door :)
Now it's your turn! I hope you will head on over to Cooking with Cricut to enter your project! TFL.
Have a crafty day!
I used a few pieces of paper (5 12X12 sheets for the actual wreath, that is IT!) from the Fall Stack from Recollections. Then I cut the turkey using some solid cardstock and some patterned pieces from the same card stock stack for the turkey (I used Create a Critter to cut him and his layers). Then I added some googly eyes and a little gold pen for some feathers and to outline his hat. The Give Thanks is also from the Recollections stack, there was a sheet with a bunch of sayins and journaling boxes and I thought this one was perfect for my wreath. I used some ribbon I bought at Joanns for $1 to hang the wreath! I think it turned out cute and my kids love seeing it on the door :)
Now it's your turn! I hope you will head on over to Cooking with Cricut to enter your project! TFL.
Have a crafty day!
Wednesday, October 26, 2011
Cooking with Cricut Weekly Challenge: Scarecrows, Hay, Crows and Sketches
Hello everyone. Today is Scarecrow, Hay, Crows AND Sketches Challenge Day over at Cooking with Cricut! For this weeks challenge I used a scarecrow (scaregirl) and the card sketch to make a card for my friend who always calls everyone pumpkin! We do not get to talk much except via social media from time to time so I wanted to send her a card and I thought this was the perfect time to do it!
Here is the sketch:
Here is my card:
I used the Scarecrow Girl on Pumpkin Digital Stamp from http://www.papercraftingworld.com/, then I cut out a pumpkin from Create a Critter, gave him a cute Peachy Keen face and added a cute blingy vine from Recollections glitter tape. The sentiment is from the Pink by Design Guess Who stamp set (seriously I have gotten my monies worth out of that set)! I cut some patterned paper, some purple paper, put it on black cardstock, inked some edges and it came together! I know she will love the card.
Now it's your turn! I hope you will head on over to Cooking with Cricut to enter your project! TFL.
Have a crafty day!
Monday, June 20, 2011
Mady Moo Turns 2 (Part 2 of 2)
Well, it seems as though I did not get as much done for my baby girls birthday as I wanted :) I think with the end of school and baseball season (and work and 4 kids, lol) I ran out of time! I did get to make her a quick banner and I made and decorated her cake myself. I used the Old West Rope font for the letters on the banner, which were perfect because I had used a rope font on her invitations! I used the create a critter for the little cow (again). She loved blowing out the candle on her cake and she loved having everyone (her cousins) over to help celebrate turning 2! I used some new wilton molds for the fondant decorations. I had planned to cut a cow with my Cricut cake but I ran out of time! If only there were a few more hours in each day! Don't ya just love her little cupcake dress! I had to get one for my 3 year also, they both loved wearing them. TFL.
![]()
![]()
![]()
![]()
Monday, June 13, 2011
Last Day of School!
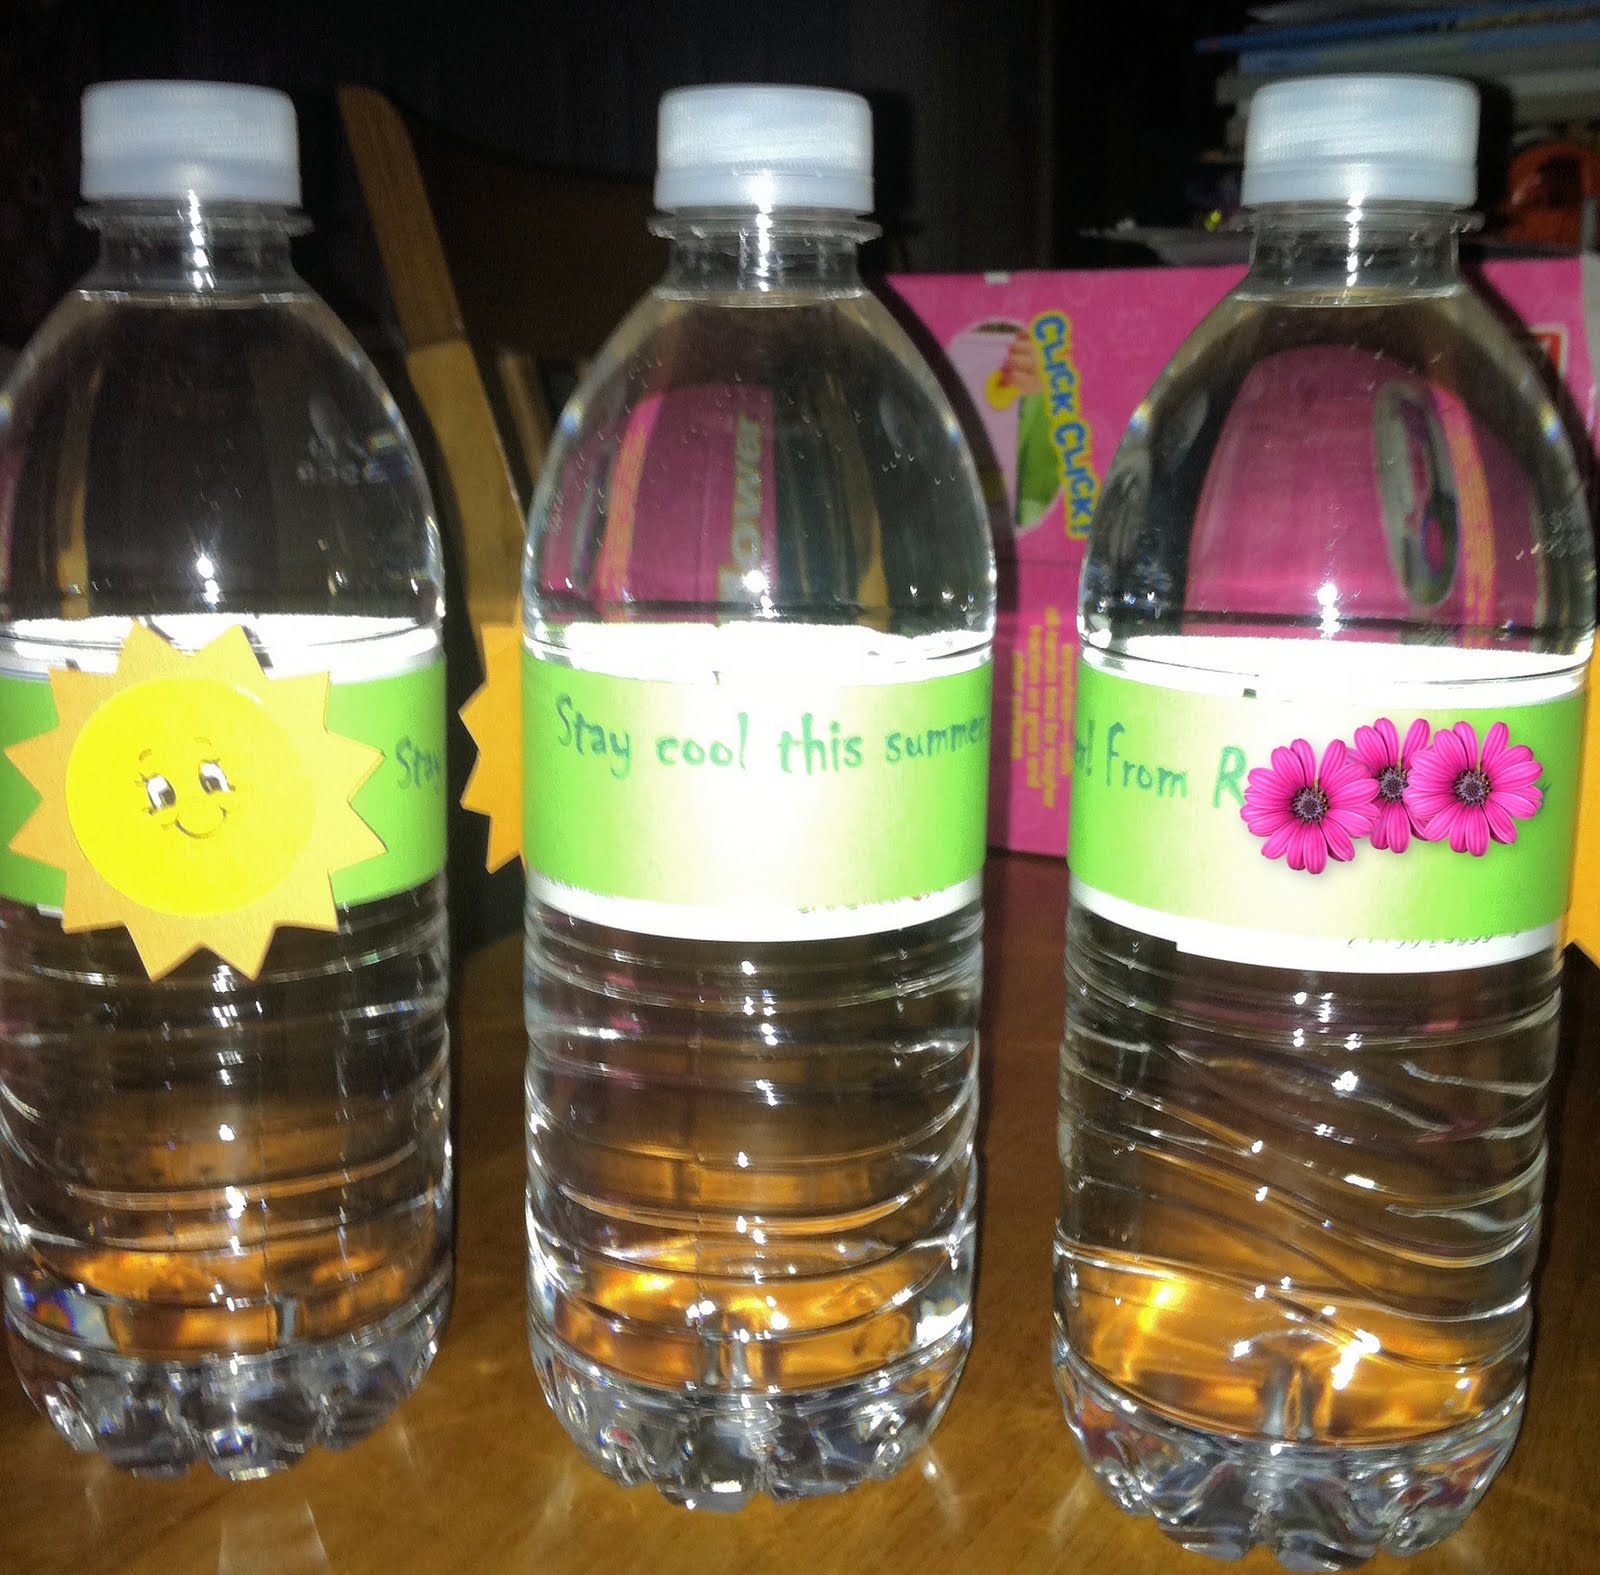
As a fun little class gift I made these water bottles for my older son to take for his classmates on the last day of school (my younger son did not want to take them in for his class). I also made a couple for the school office staff and Religion and Music/Art teacher. I used Create a Critter for the sun and stamped him with my cute Peachy Keen face stamps (LOVE LOVE LOVE them). I had seen this idea online but from a teacher to her students. I changed it a bit and made it work for the students from a class mate!

My older sons teacher was retiring also so I wanted to make her a card and we got her a Maryland Terp themed gift since she is such a huge Terps fan! I used my new Peachy Keen face stamps for the sun and the faces below (I actually did not need to use my Cricut for anything for the card below, can you believe it!). I scraplifted this card idea from online but do not have the blog because it just came up under images when I did a search for retirement cards. It was so quick and I love the little faces!

My older sons teacher was retiring also so I wanted to make her a card and we got her a Maryland Terp themed gift since she is such a huge Terps fan! I used my new Peachy Keen face stamps for the sun and the faces below (I actually did not need to use my Cricut for anything for the card below, can you believe it!). I scraplifted this card idea from online but do not have the blog because it just came up under images when I did a search for retirement cards. It was so quick and I love the little faces!
Monday, June 6, 2011
Mady Moo Turns 2! (part 1 of many)
My baby is turning 2 this week :( I cannot believe it. I am having a serious case of baby fever. Even though she has not been the easiest of my 4 (which my husband keeps reminding me) her turning 2 makes me want another one more than I expected. When she was a baby I started calling her Mady Moo or Moo Moo and now she even refers to herself as Moo Moo and family and friends call her Mady Moo. At her first birthday my good friend made a paper cake and she joked about just changing the decorations on it to Mady Moo turns 2! for her second birthday. That has stuck with me so that is our theme this year! Here are her invitations for our small family party. I had the idea for the cow (obviously) for a while and then in the Cricut Magazine a couple of issues ago there was one which gave me more inspiration. I used Create a Critter for the cow front, back and layers. It was actually not that easy to put together and I had to print the invitation details and then cut them in the flip shape using center cut (it took a few mistakes to get it right) but I think they turned our SUPER cute! I hope you will agree. I plan on using this cute cow as inspiration for the party decorations as well. Since we are in midst of baseball playoffs and parties her birthday party will be a little later in the month even though her birthday is this week so I have time to get those decorations done once I finish end of the school year teacher gifts this week! LOL. Anyway, thanks for looking for now, hope you come back to see the rest!
![]() |
| The real invitations has the details not little cute flowes all over it :) |
Monday, May 23, 2011
Relay for Life
This past weekend my sons, my sister-in-law, my niece, my mom, my aunt and a couple of friends participated in the Relay for Life in honor of all who suffer from Cancer but mostly in honor of my Grandfather who passed away last year after suffering for years with non-Hodkins Lymphoma. Although I was not officially on the team (I signed the boys up to represent us all) I did most of the work on the boys behalf (except the actual walking the laps, LOL). I made a banner of our team "logo" To Hail With Cancer, which I really enjoyed making and am very proud of. I used my Gypsy to plan it all out, the Sports Mania cartridge for the triangles (using the hidden contour feature), Old West for the letters and Create a Critter for the clouds and umbrella. I think I may have used it for the snow flakes also but I am not sure about that. I added clouds after I took the "final" picture so I took a picture of that portion. I made those pieces of the banner to divide the words. I hope to make another banner using the same base (different colors) for my daughters upcoming 2nd birthday!


Also, as a part of the Relay for Life we had an onsite bake sale. I made cupcakes and cookies. For those I made little cupcake toppers using our team "logo" To Hail With Cancer that my sister in law made and I made little cookie pouches using those stickers I made and CD envelopes. I used my Cricut after I printed the stickers on 8 1/2 X 11 stickers sheets to cut out the circles using the center cut option which I LOVE! TFL.


Also, as a part of the Relay for Life we had an onsite bake sale. I made cupcakes and cookies. For those I made little cupcake toppers using our team "logo" To Hail With Cancer that my sister in law made and I made little cookie pouches using those stickers I made and CD envelopes. I used my Cricut after I printed the stickers on 8 1/2 X 11 stickers sheets to cut out the circles using the center cut option which I LOVE! TFL.
Labels:
baking,
Create a Critter,
Gypsy,
Old West,
Sports Mania
Subscribe to:
Posts (Atom)